
Do you know why Flipper Zero is so popular? Not because of the little cute dolphin, but because you can use it right out of the box. If we made Flipper Zero in a Proxmark3-like form factor without a screen (no offense, Iceman), it would only be used by a small group of hardcore professionals. We all love simple, clear things: press a button and get results.
Before Flipper Zero, no one really cared about intuitive interfaces of niche devices for geeks. Everyone was building separate hardware and a companion app for user interface. NO ONE WANTS TO CREATE PIXEL-PERFECT INTERFACES for small screens - it's a pain, even for us. But we've become pretty good at it, and we believe we can contribute to the industry by creating a universal graphical interface framework. Since we were doing this for Flipper One anyway, we decided to open it up for others to use in their own projects.
In this post:
- FlipCTL: our GUI framework for embedded systems, which can be used on any Linux device.
- Why all existing interfaces for embedded systems suck.
- Help us develop the right architecture for FlipCTL.
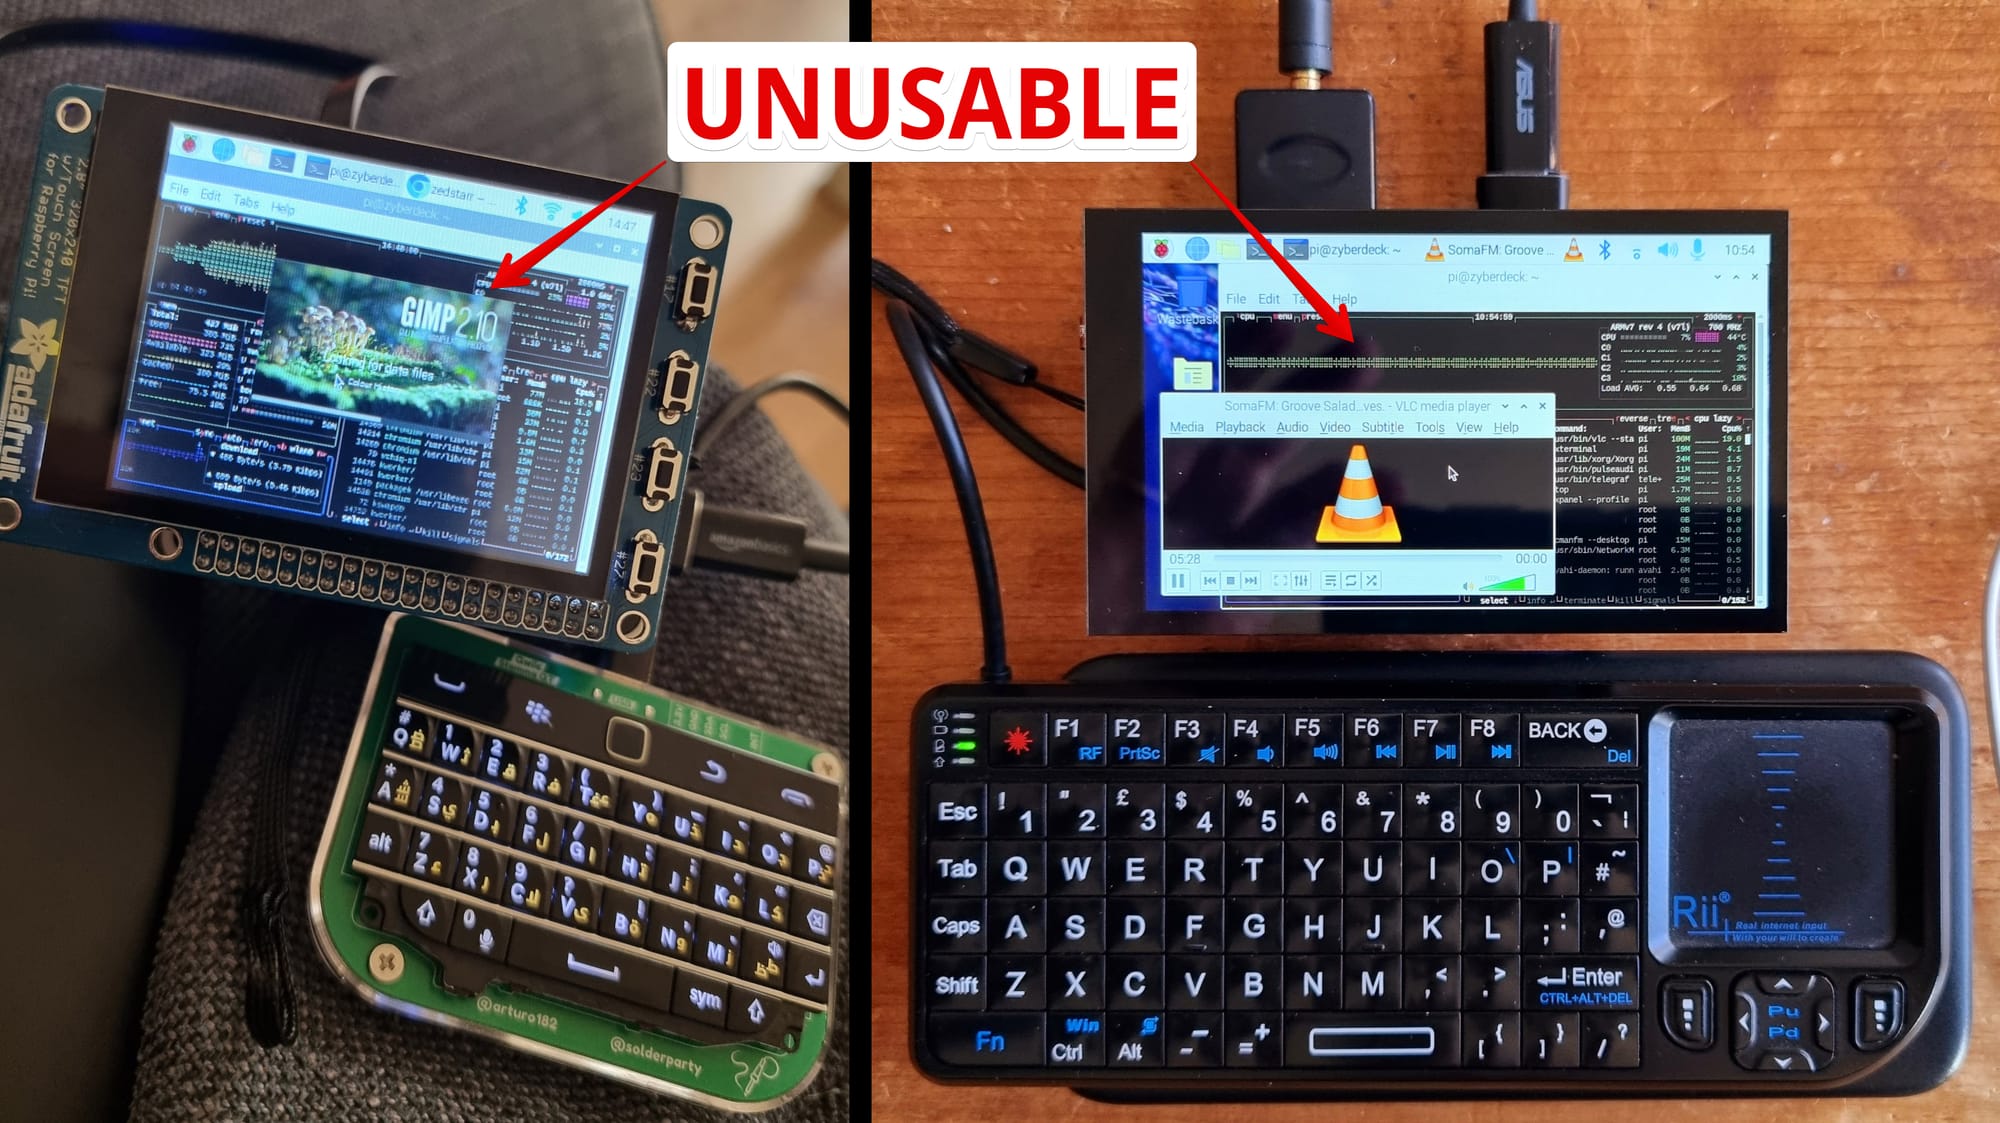
Cyberdecks look cool, but they’re impossible to use. The main problem with all cyberdecks is their crappy interface. They usually just take a standard KDE/GNOME desktop, or even Windows, and try to pretend you can actually use it. No, you can’t. It’s bullshit. It’s impossible to hit a microscopic button on the screen using a touchscreen or tiny trackball, and plugging in a mouse is awkward.
Desktop vs small-screen optimized interface
In most cyberdecks, the controls are not designed for the user interface running on the device. The typical approach is to add some buttons and run a desktop interface that was built for a mouse and keyboard. That's the main problem.
0:00
/0:14
Which interface do you find more user-friendly on a small screen?
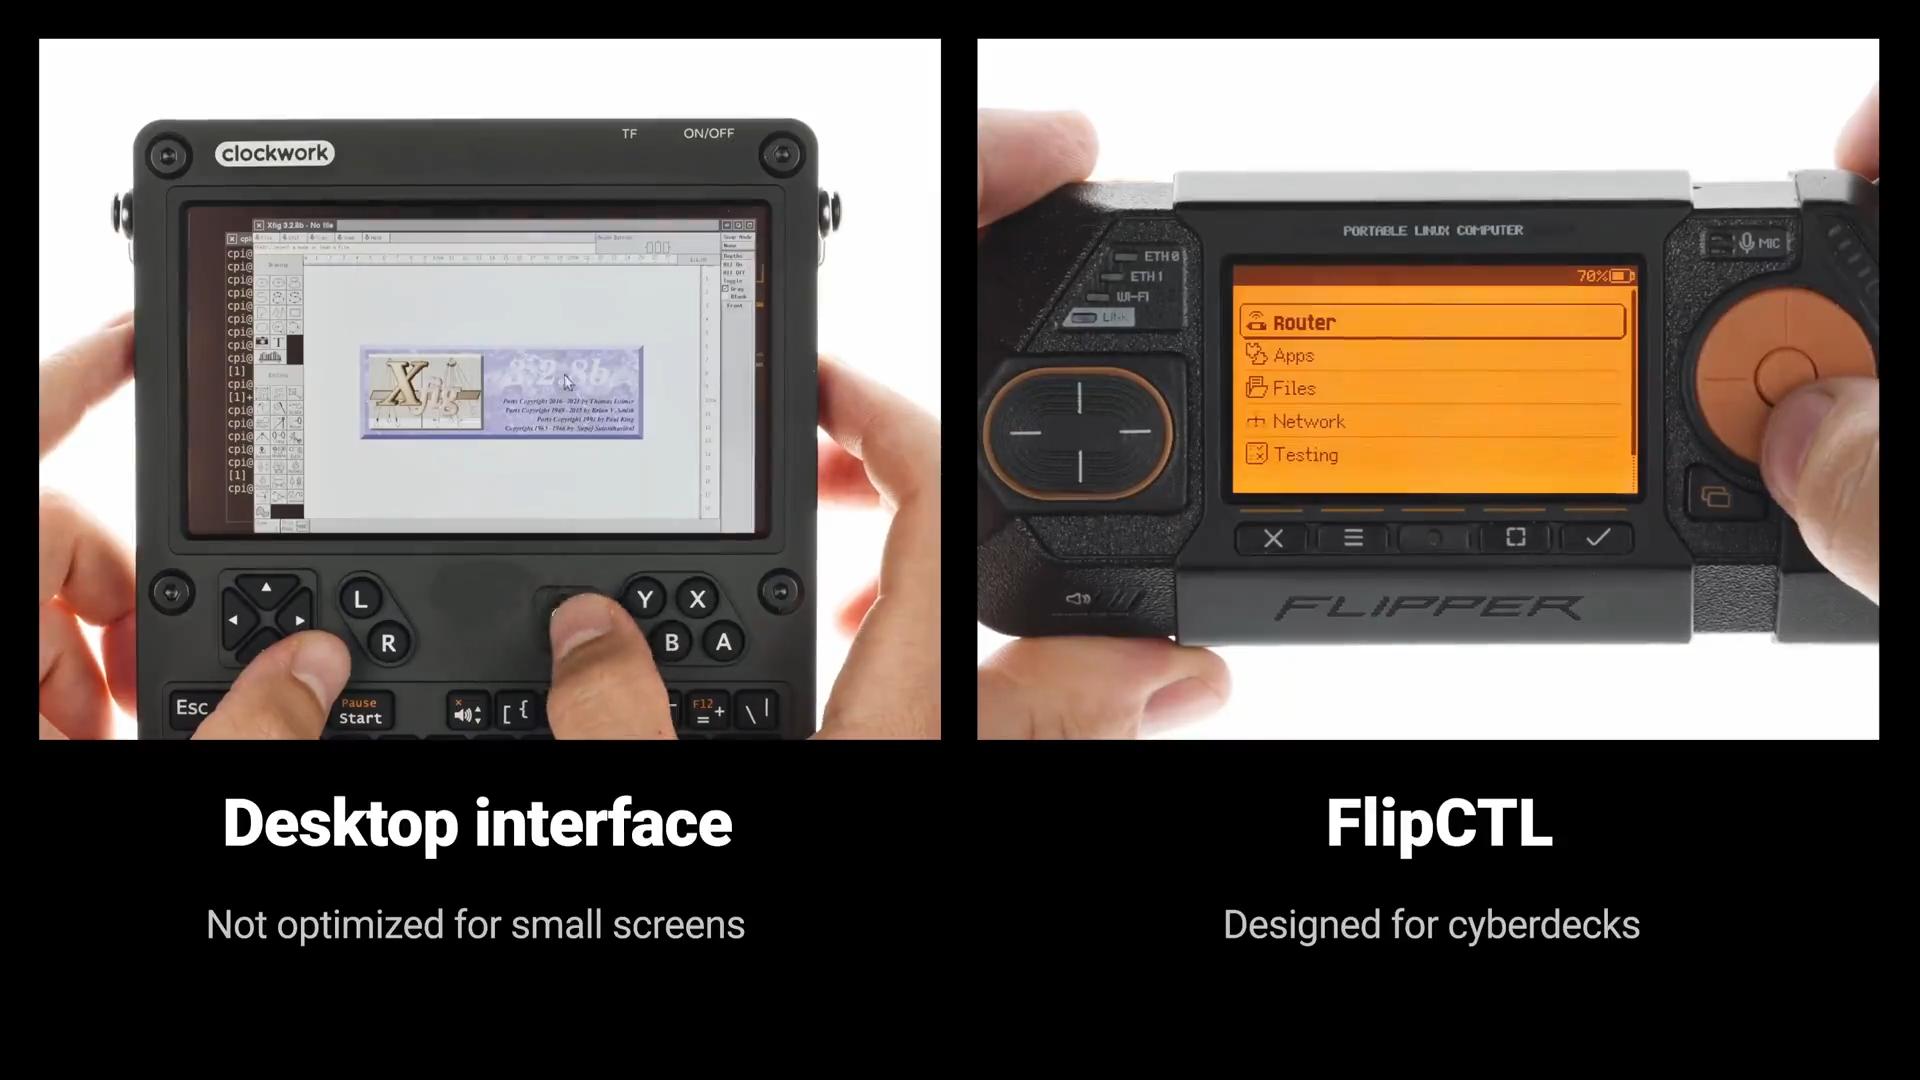
Only major vendors can afford to develop controls and graphical interfaces together, with each designed around the other: game consoles, smartphones, televisions, and the like. This requires a dedicated team and long, thankless hours of work. You need to build a UX system and go through countless iterations of testing and improvement. DIY projects by enthusiasts typically don't have that luxury. We decided to try to change that, so any project can have a great graphical interface with little effort.
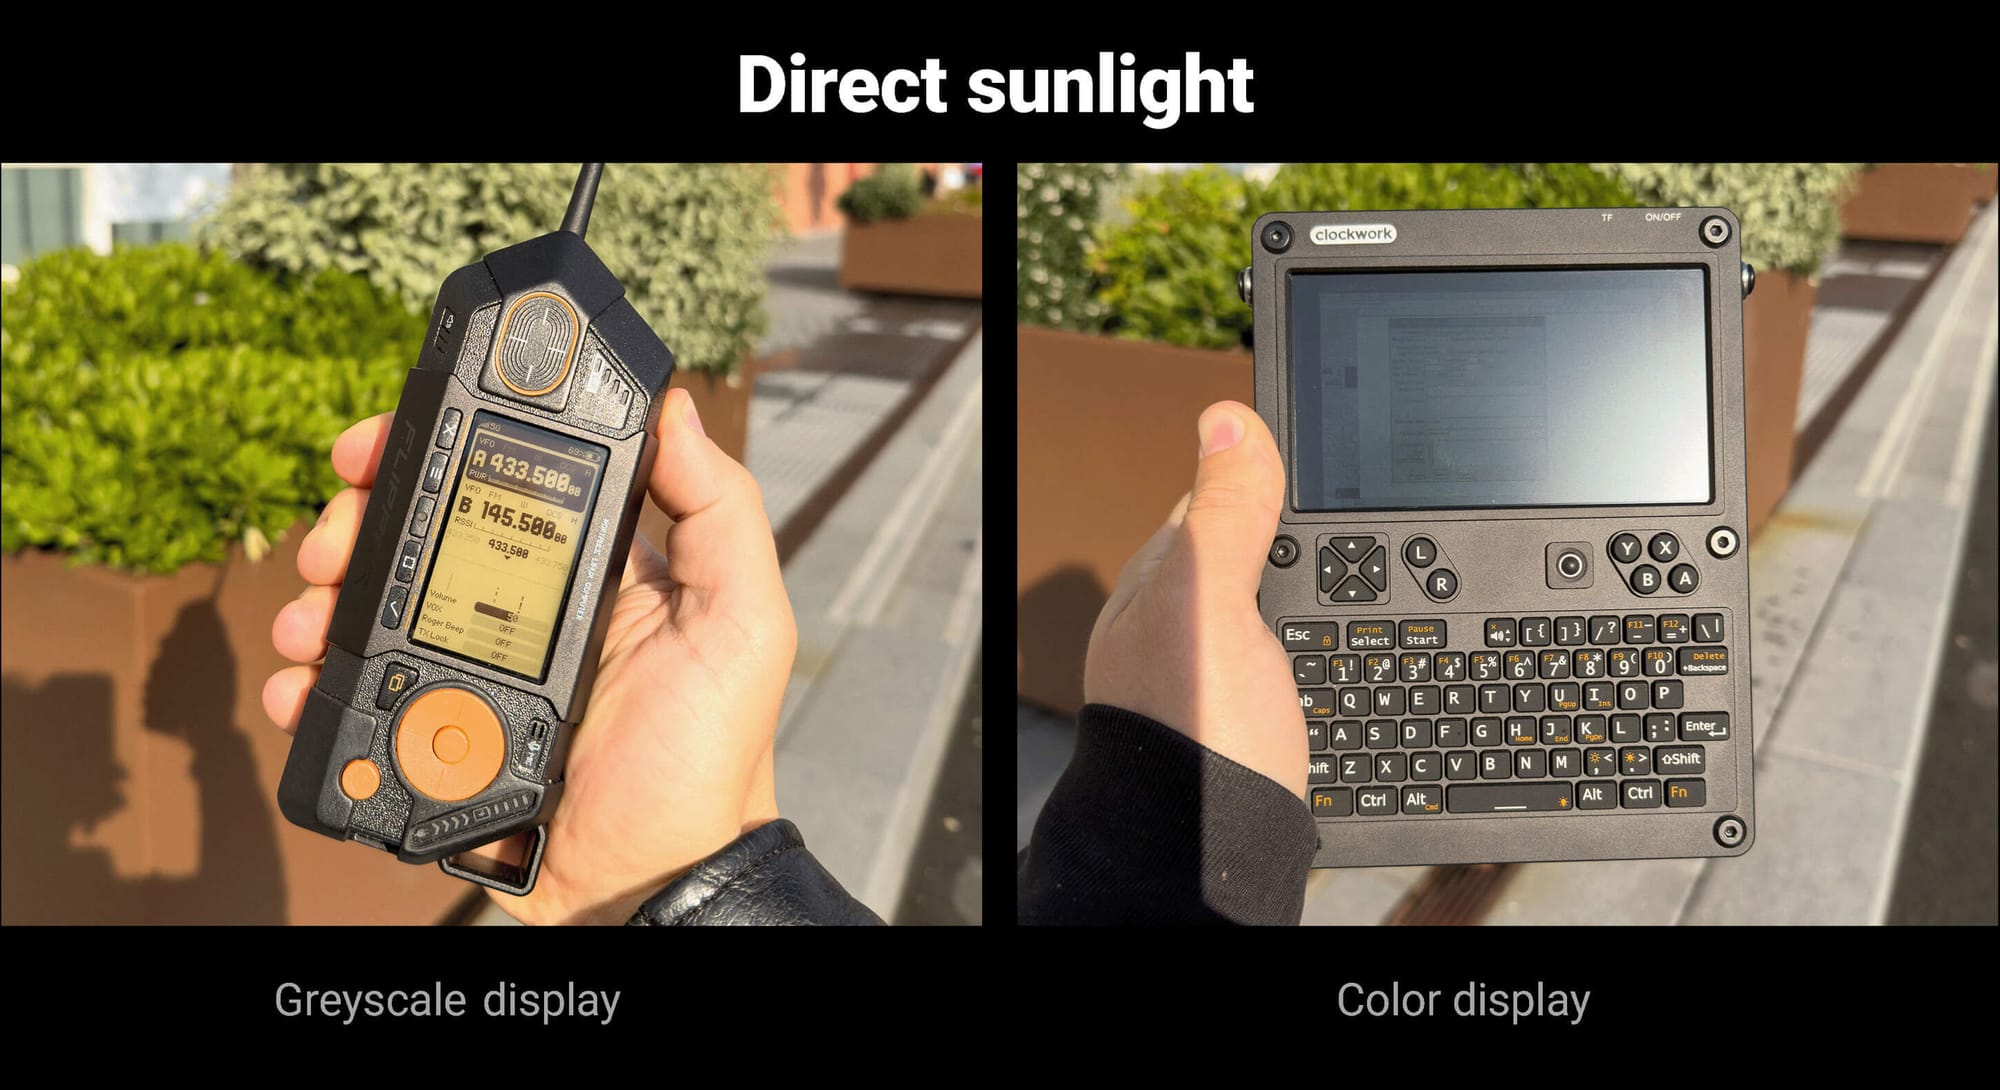
The answer is that grayscale display is better in every way for system GUIs where color isn't needed. Just look at the comparison photo, and your questions will be answered.
The main advantages of a grayscale display:
- Low power consumption — our display can be used without a backlight, as ambient light is reflected by the display's backing layer. In this mode, power consumption drops to just 14 mW. Color displays always require a backlight, and in bright outdoor conditions, you need to set the backlight level to maximum to keep the display readable. In this case, a similarly sized color display typically consumes 800–1000 mW.
- Perfectly visible in direct sunlight — the brighter the sun, the better our grayscale display looks. Color displays, on the other hand, become increasingly difficult to read outdoors. We want our interface to be usable in real-world field conditions, not just on a desk for social media photos.
- Less system load — to achieve truly high image quality on a color display, you need a VERY expensive, high-resolution display that requires significant computing resources and puts a strain on the system just to render the image. A color display would STILL lose out to our grayscale display in terms of contrast. Meanwhile, on a grayscale display, you can achieve high image quality even on low-power embedded systems.
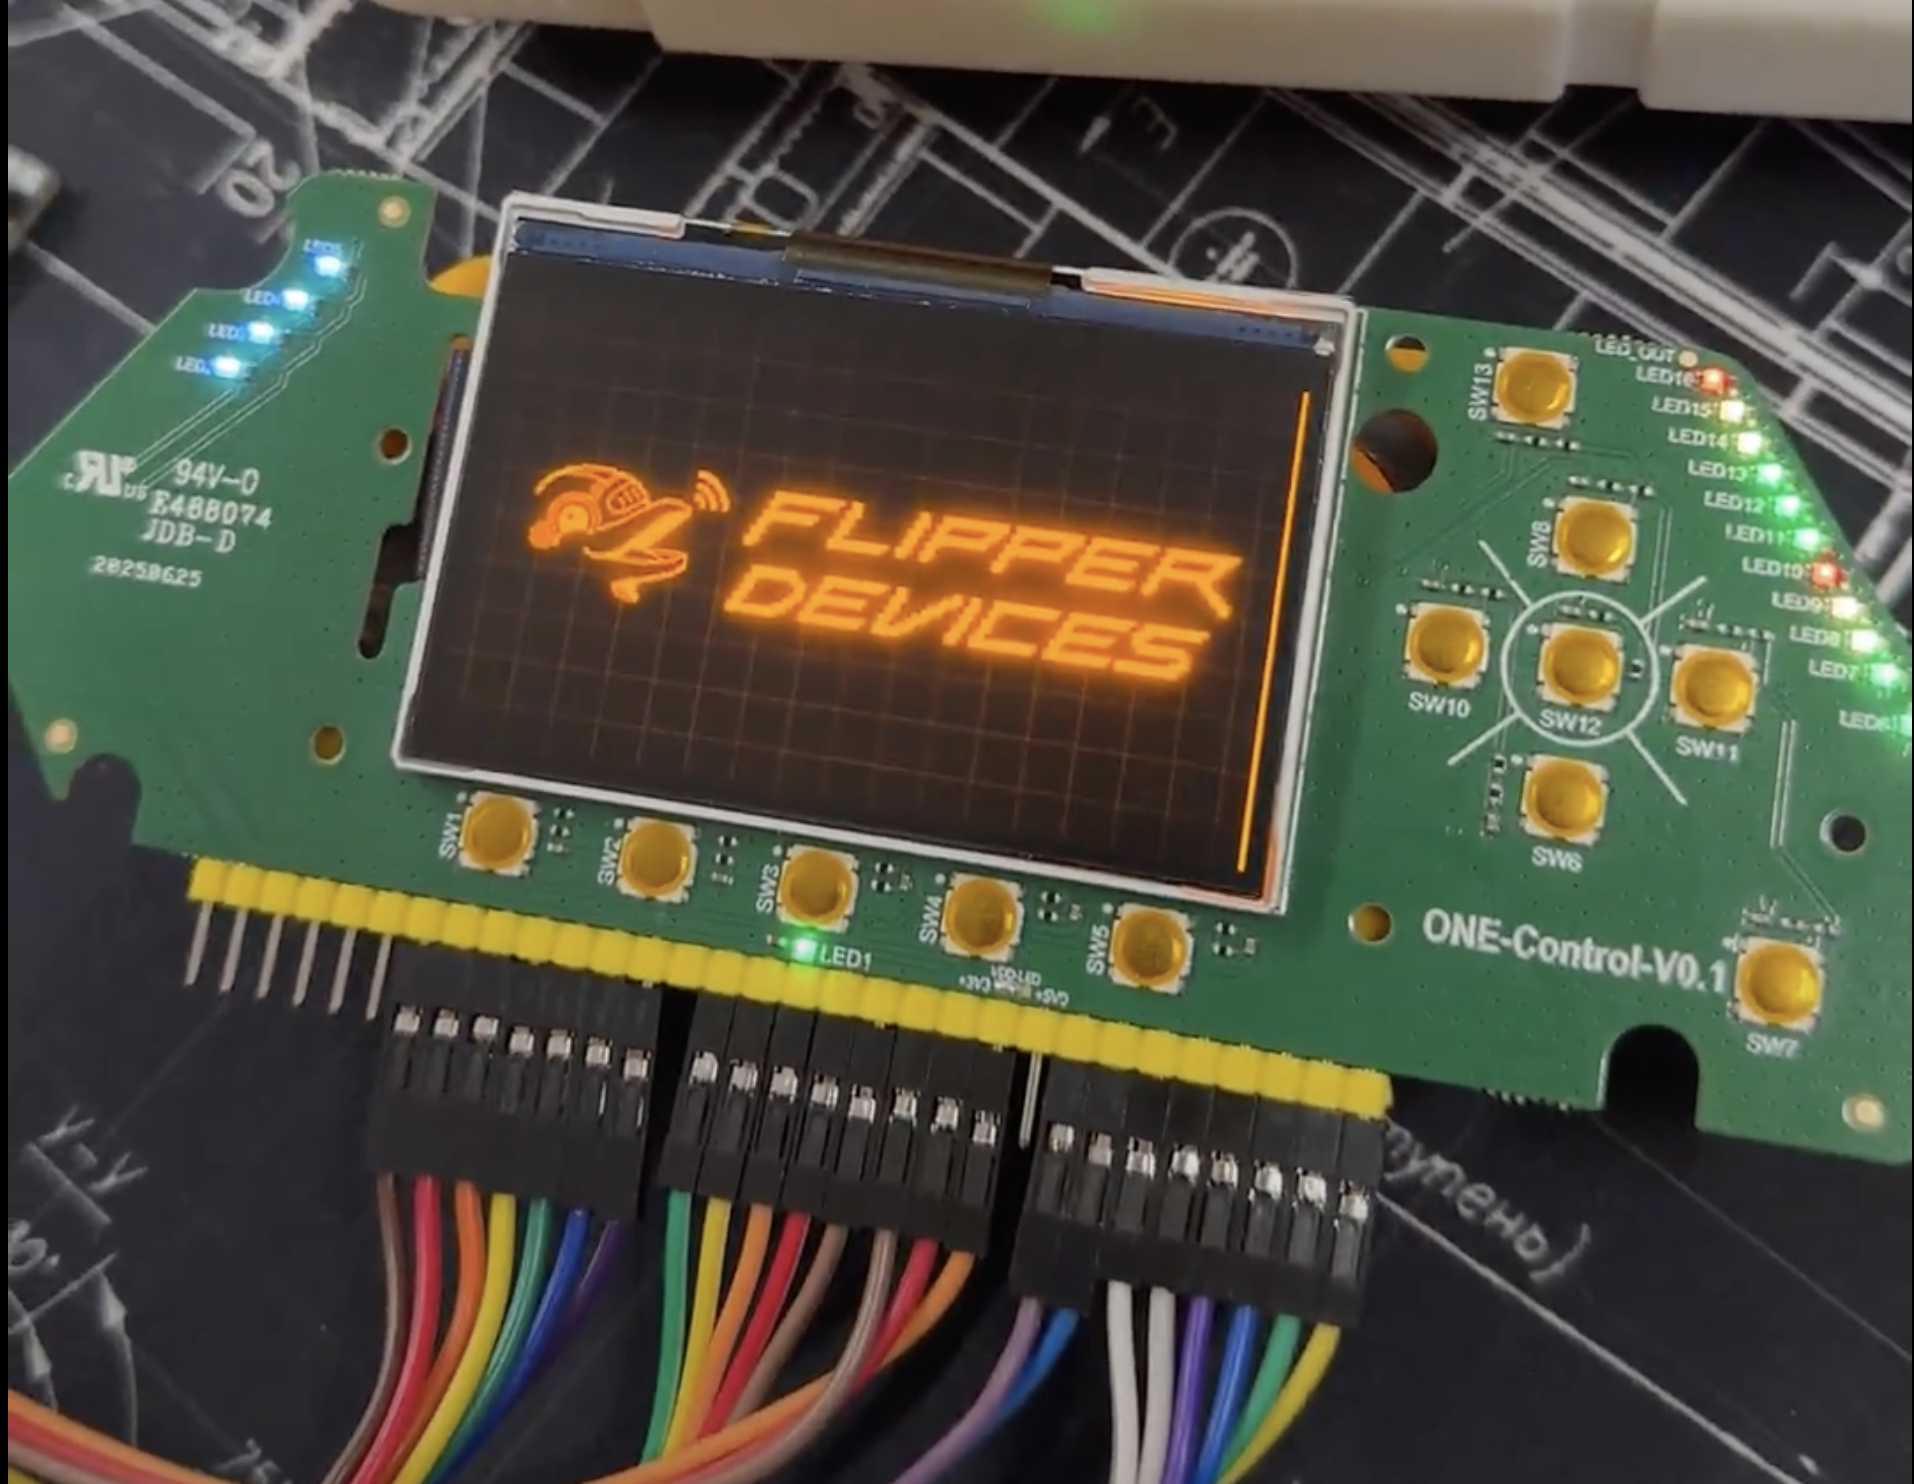
For Flipper One, we designed our own grayscale display with a custom resolution of 256×144 pixels. Displays of this type are no longer actively developed, and most off-the-shelf grayscale displays are limited to 128×64 pixels. Manufacturers are no longer willing to invest in this technology, so we put significant effort into developing the exact display we needed. As a result, we have a grayscale screen made using IPS technology.
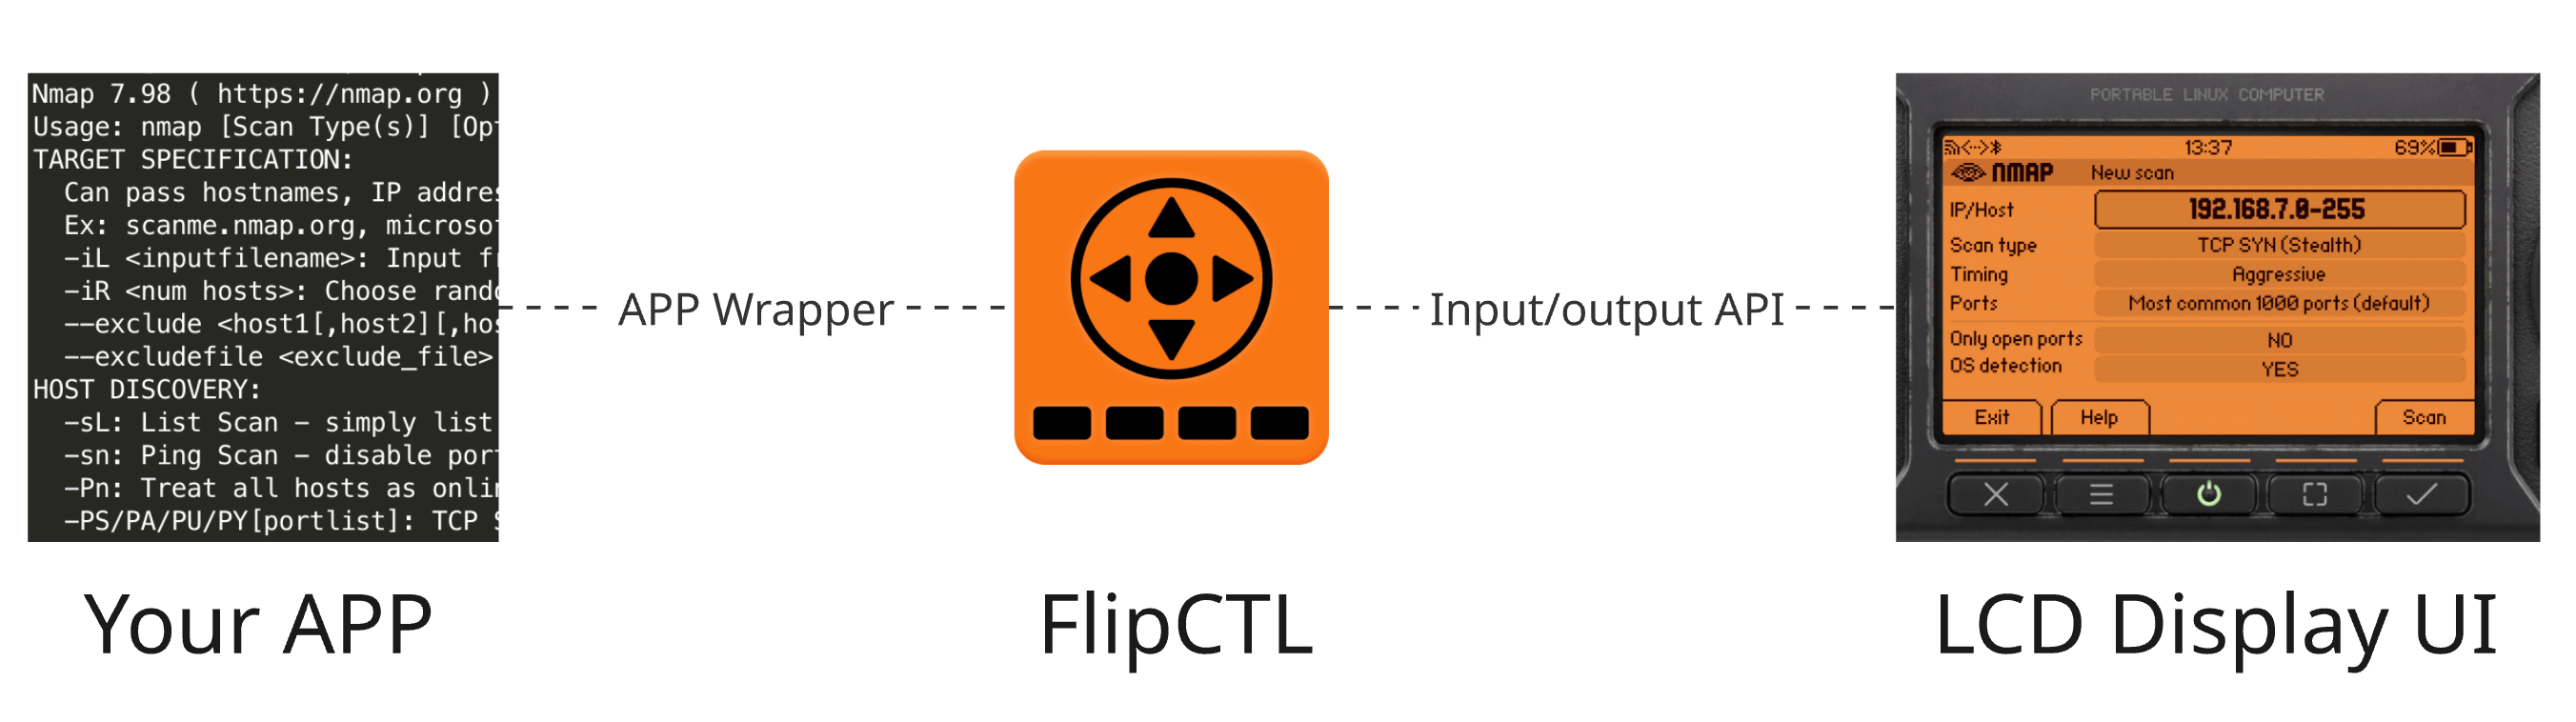
FlipCTL is our attempt to create a universal GUI and physical controls (buttons, touchpad) that can be used in any project. It will work on all embedded Linux systems and be easily adapted to your needs. With FlipCTL, you don’t have to reinvent the user interface from scratch every time: you can just grab our framework and quickly implement a GUI for your project.
How FlipCTL works:
- FlipCTL is a middleware that runs as a service, wrapping CLI applications in a graphical interface.
- It renders the screen image and redirects user input (buttons, touchpad, etc).
- It can manage Linux system settings and services.
The main idea is to make deploying FlipCTL on any system as simple as possible, while also simplifying the development of graphical interfaces.
FlipCTL is a modular system consisting of a backend and a frontend. Devices other than Flipper One can be used to interact with the FlipCTL user interface.
The FlipCTL architecture is under development, and you can join the discussion or even lead the project. Read more >>
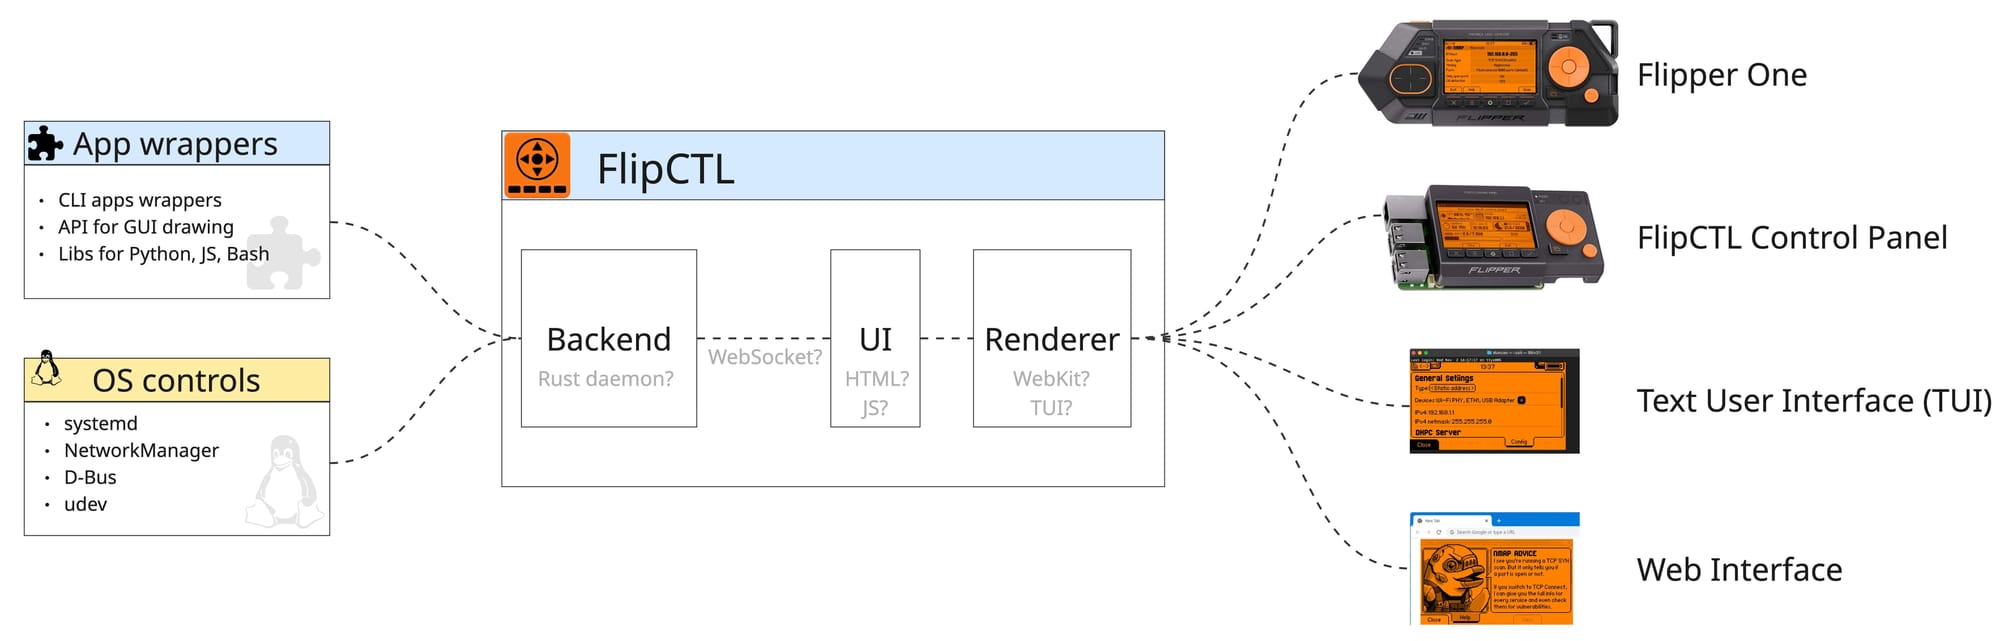
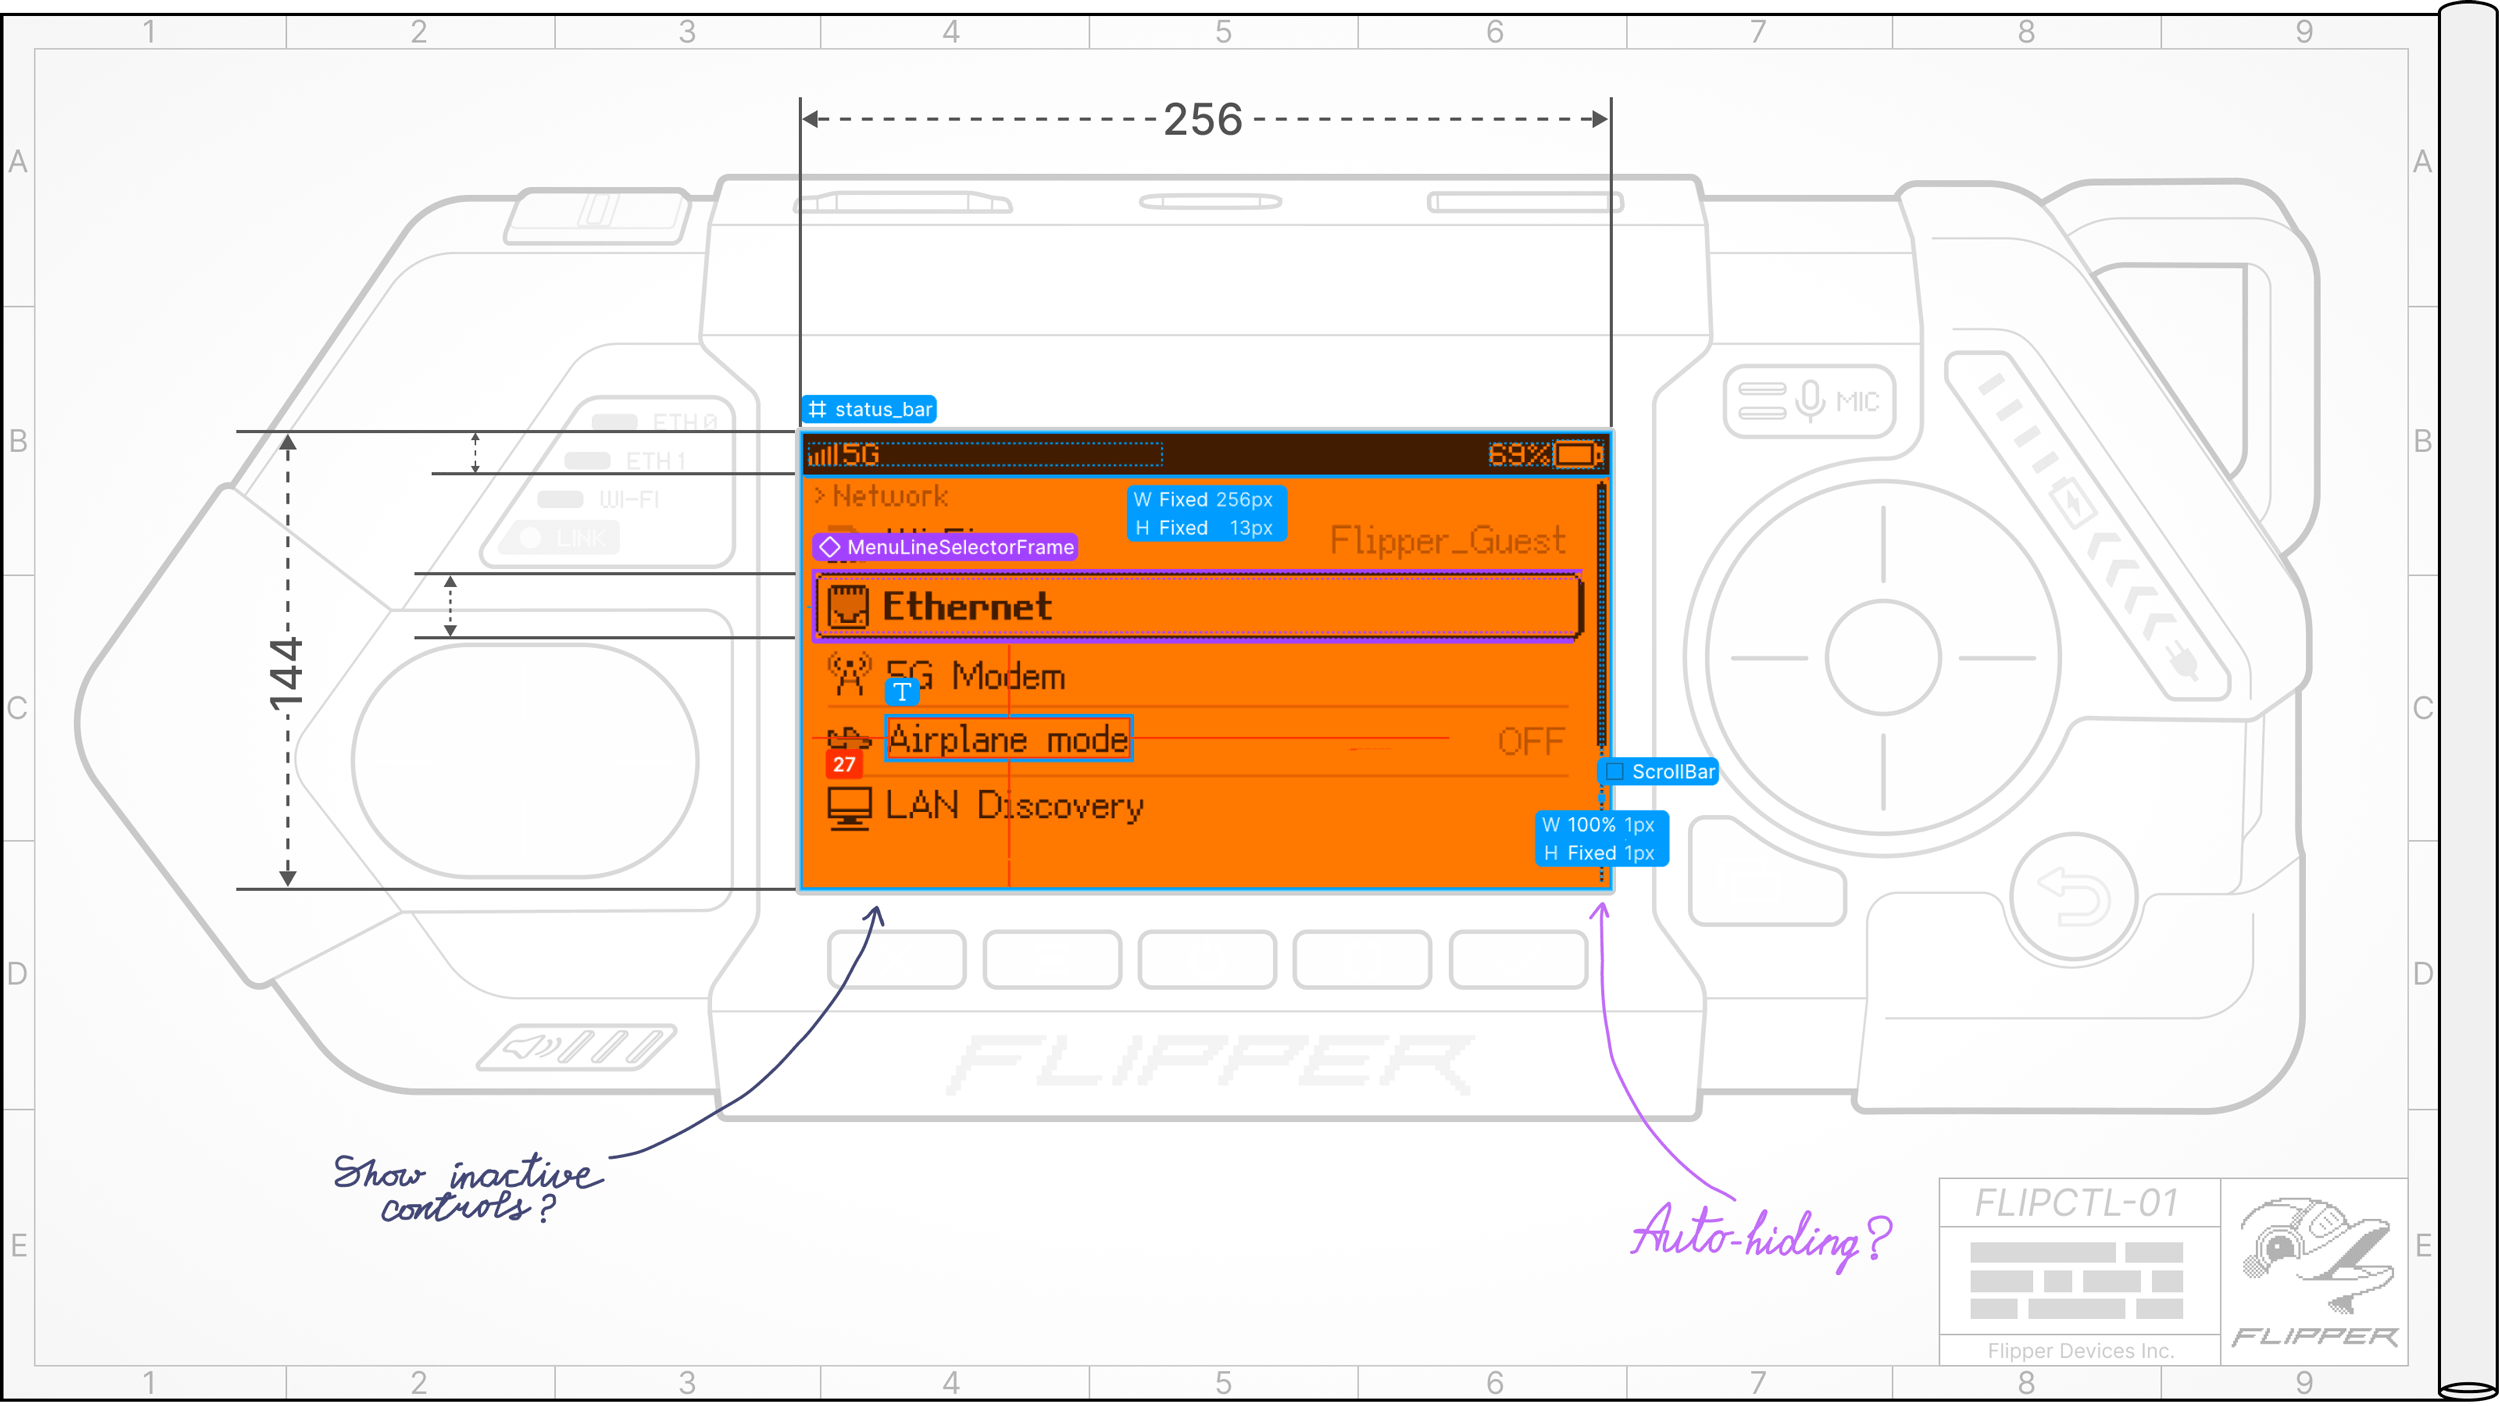
Core Components of FlipCTL:
- Backend is responsible for managing the operating system itself. It can interact with systemd, control OS services, configure networking through NetworkManager or systemd-networkd, and wrap existing command-line utilities such as
nmap,ping, andtraceroute. The backend exposes these capabilities through APIs that are consumed by the frontend. - UI Frontend is currently built using HTML and JavaScript. Despite the associated overhead, this approach enables rapid UI development and compact implementation, while avoiding the need for specialized expertise required by many embedded UI frameworks.
- Renderer is a web browser. On Flipper One, we currently use a headless WebKit instance running directly on top of DRM (Direct Rendering Manager), without Xorg or Wayland. We also want to support multiple renderer options, for example, TUI (Text User Interface) for use directly from the console.
You might think that using the web on such a small screen is overkill, and that it would be better to choose a graphics library for embedded systems. And it's true: a web engine requires a significant amount of resources compared to specialized solutions.
However, we believe that nothing compares to the simplicity and speed of web development, and this will allow the community to create many great apps, instead of wasting time trying to learn complex graphics APIs. Also, WebKit includes resource-saving tools, such as hibernation, that allow for significant resource optimization. We believe it's better to focus on optimization and make development easier. If you disagree, we invite you to express your opinion on the Developer Portal.
We're developing FlipCTL primarily for Flipper One. This is our main platform on which we design and test our interfaces, but we keep in mind future platforms. We'll invite you to participate in testing the interfaces soon.
0:00
/0:14
FlipCTL demo interface on Flipper One
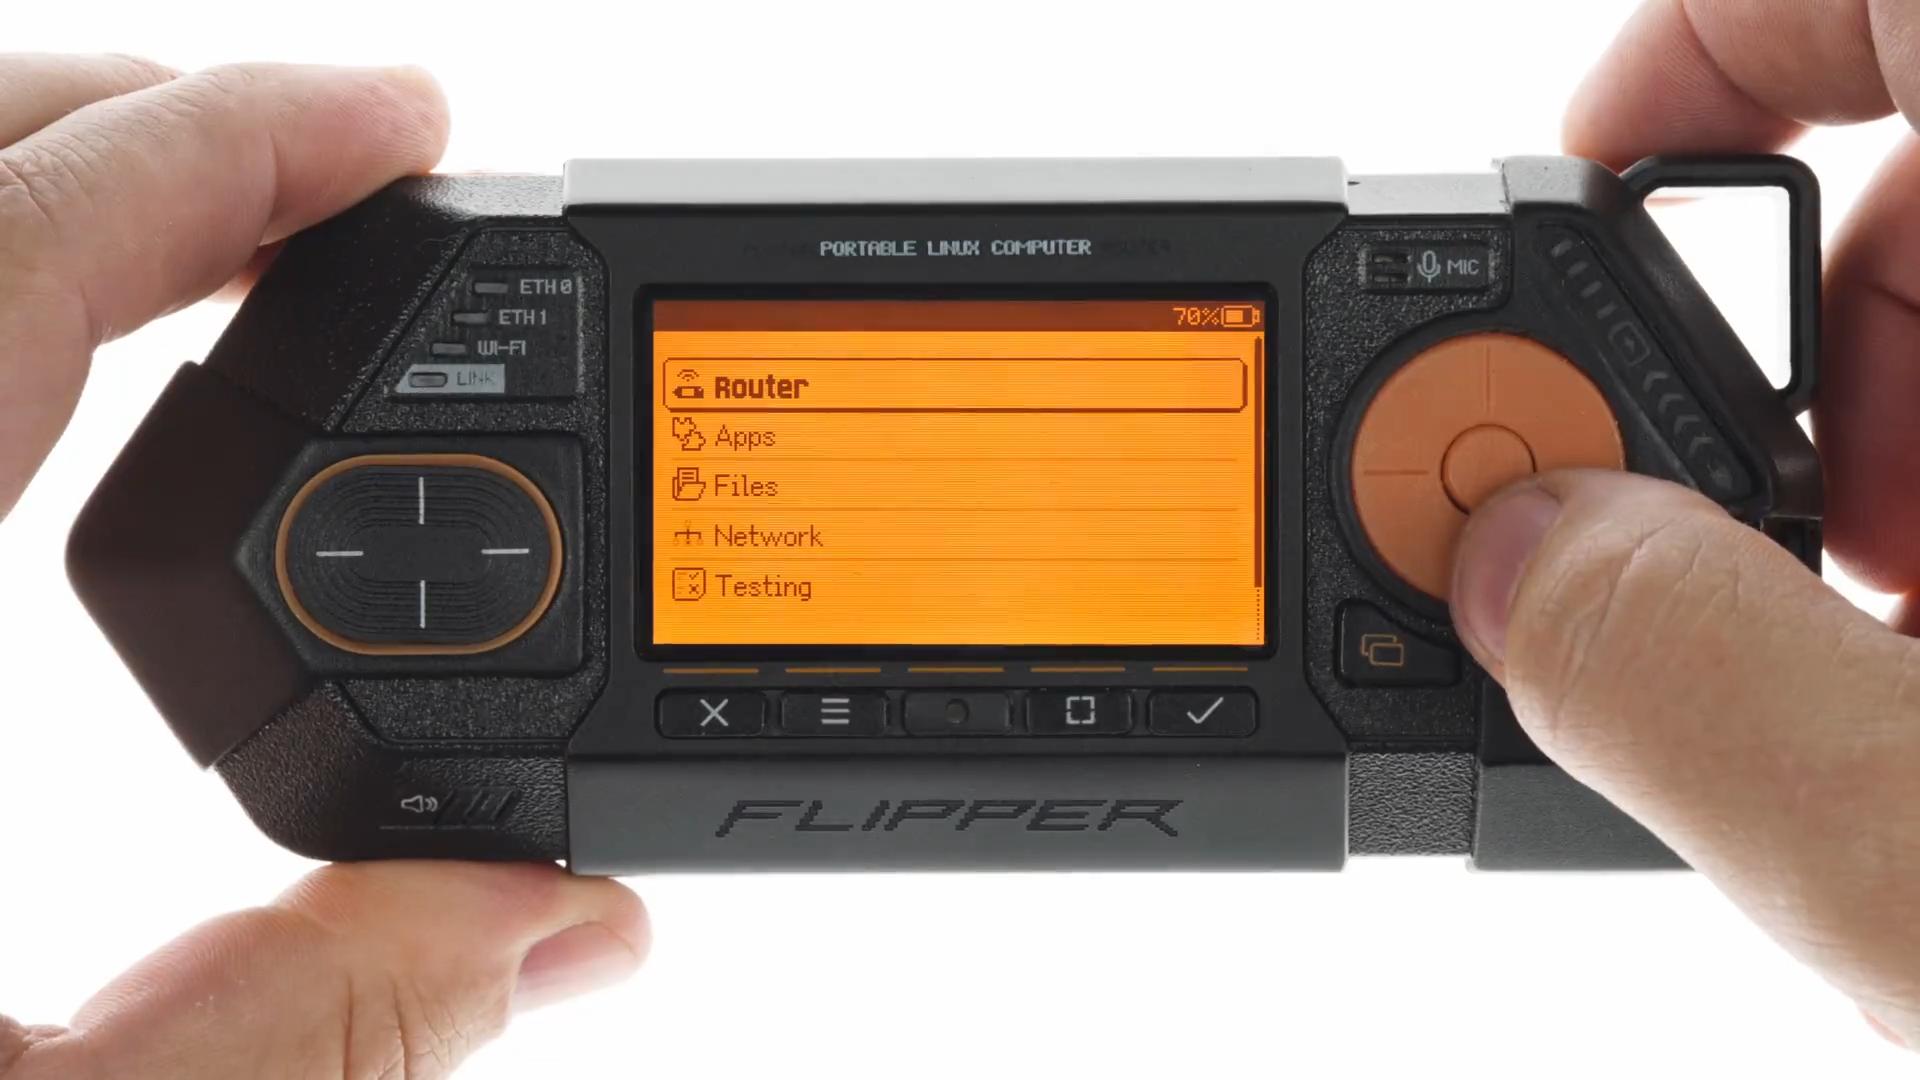
The user interface design guidelines for Flipper One are documented at docs.flipper.net/one/user-interface/about
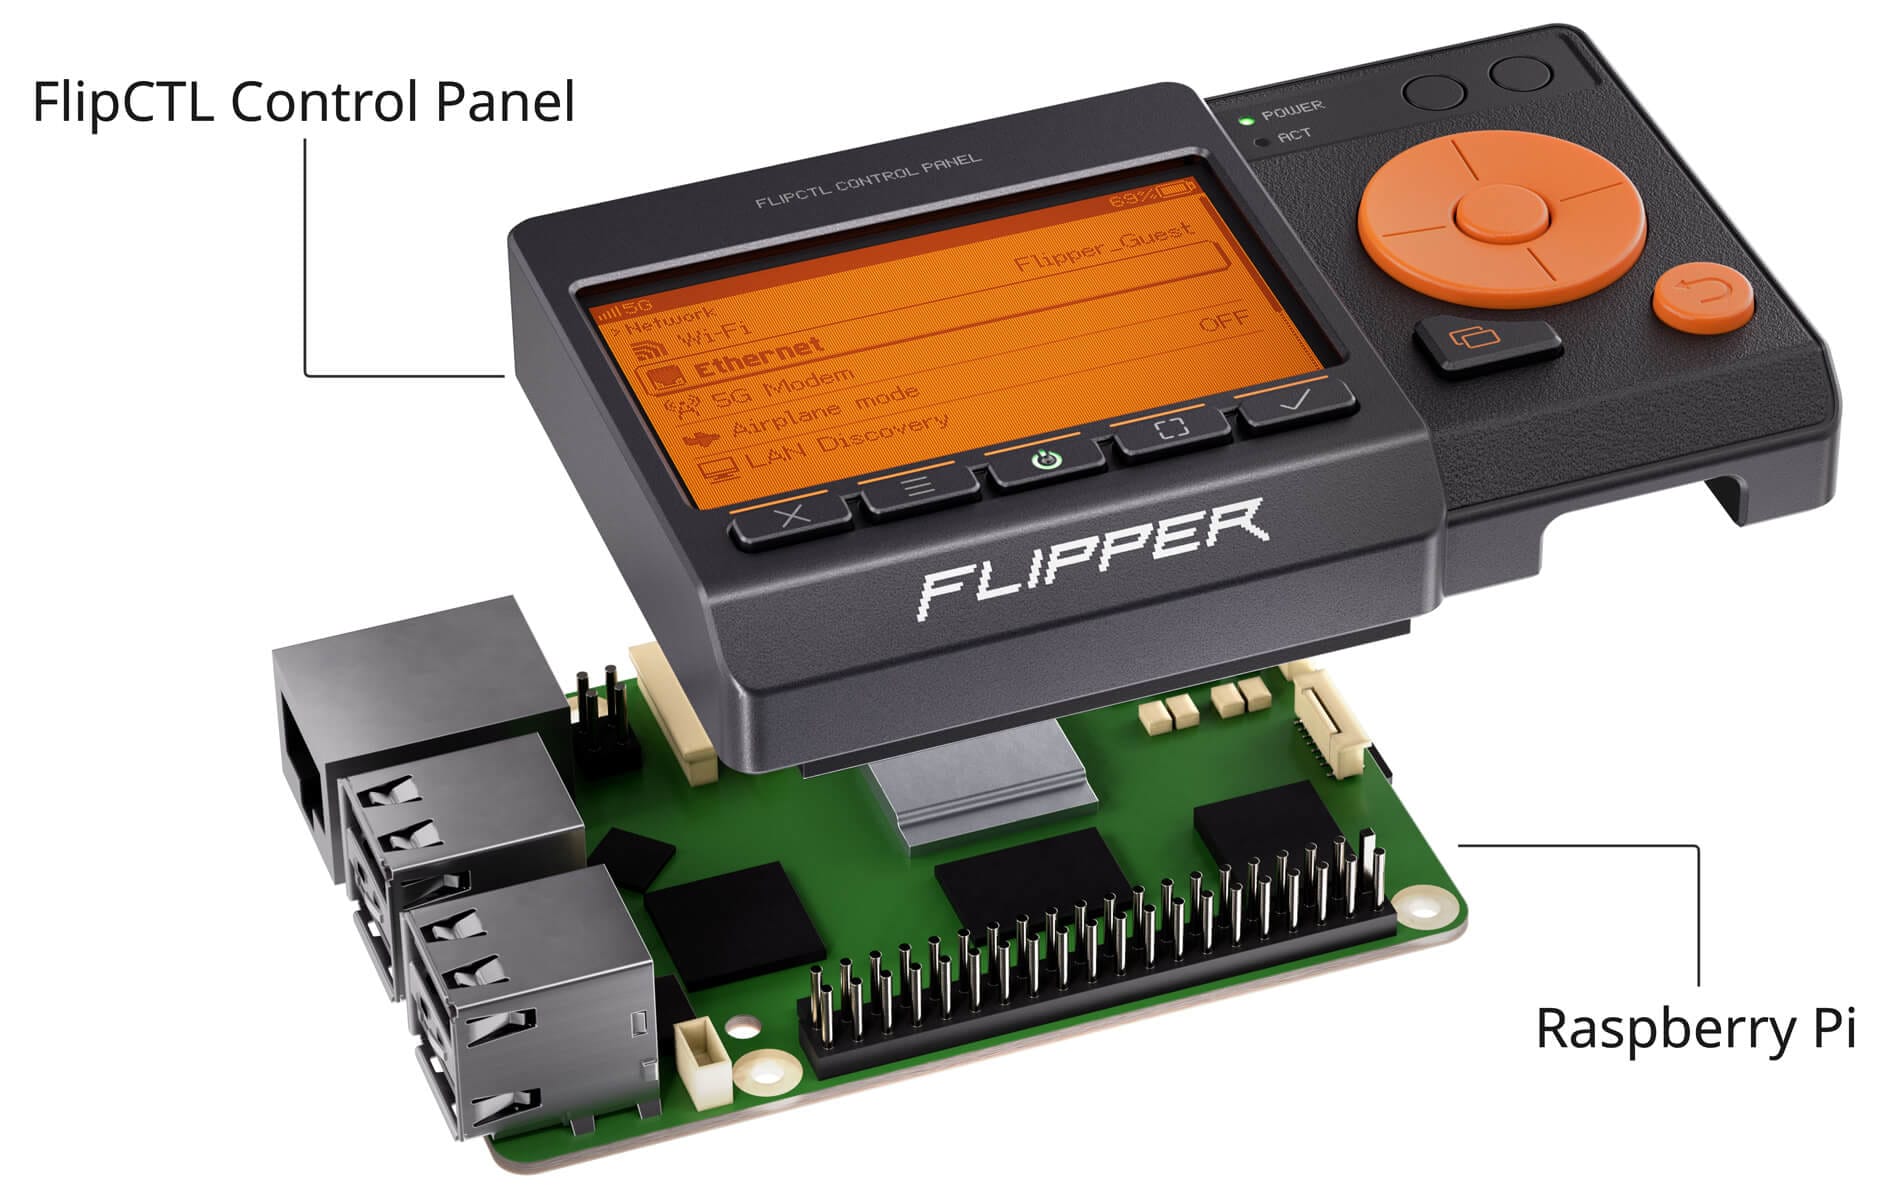
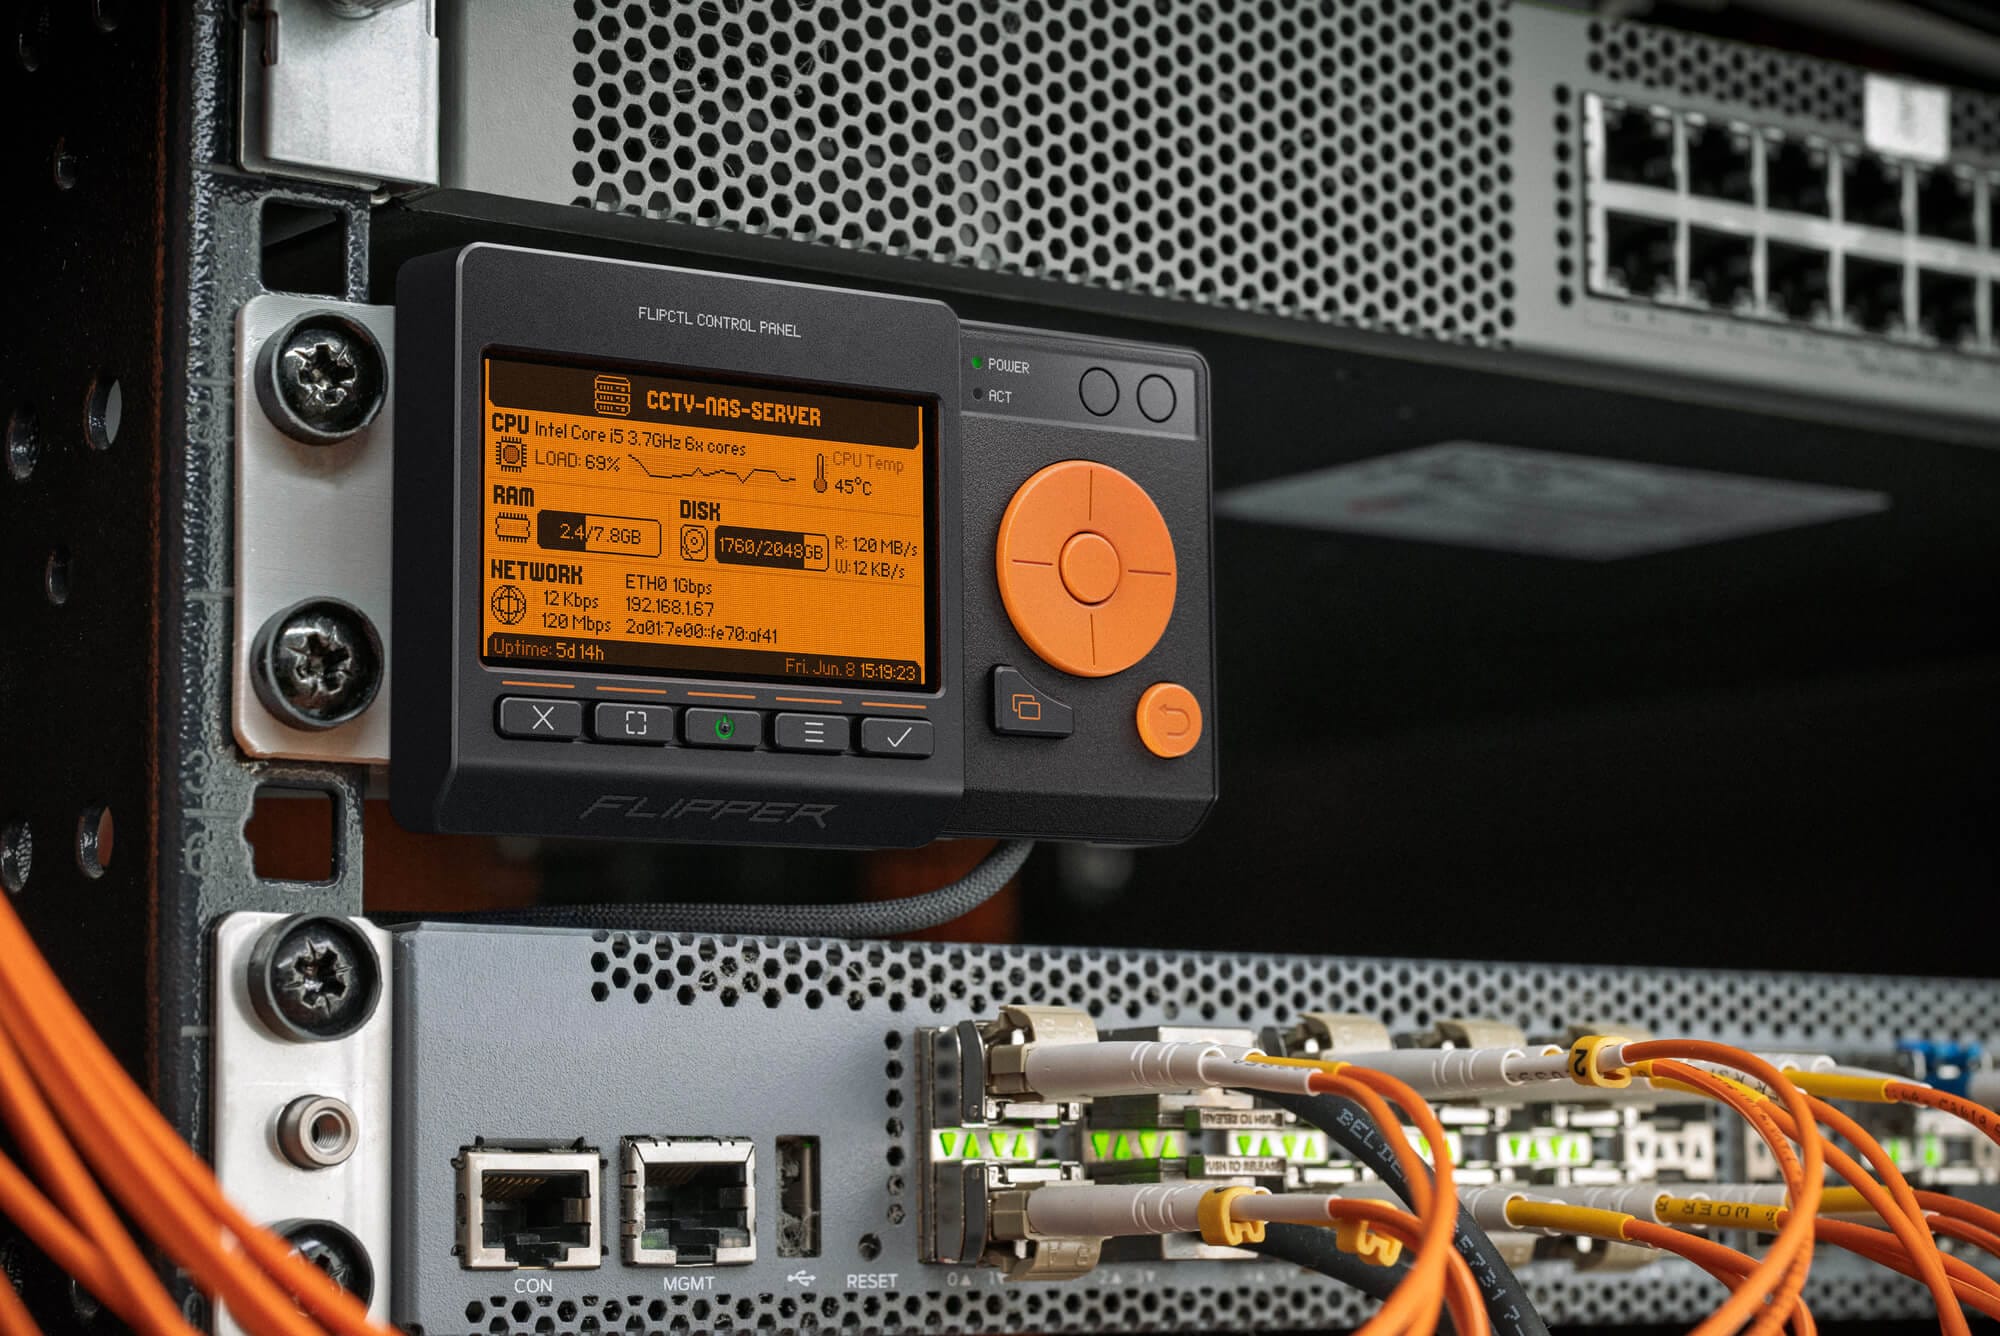
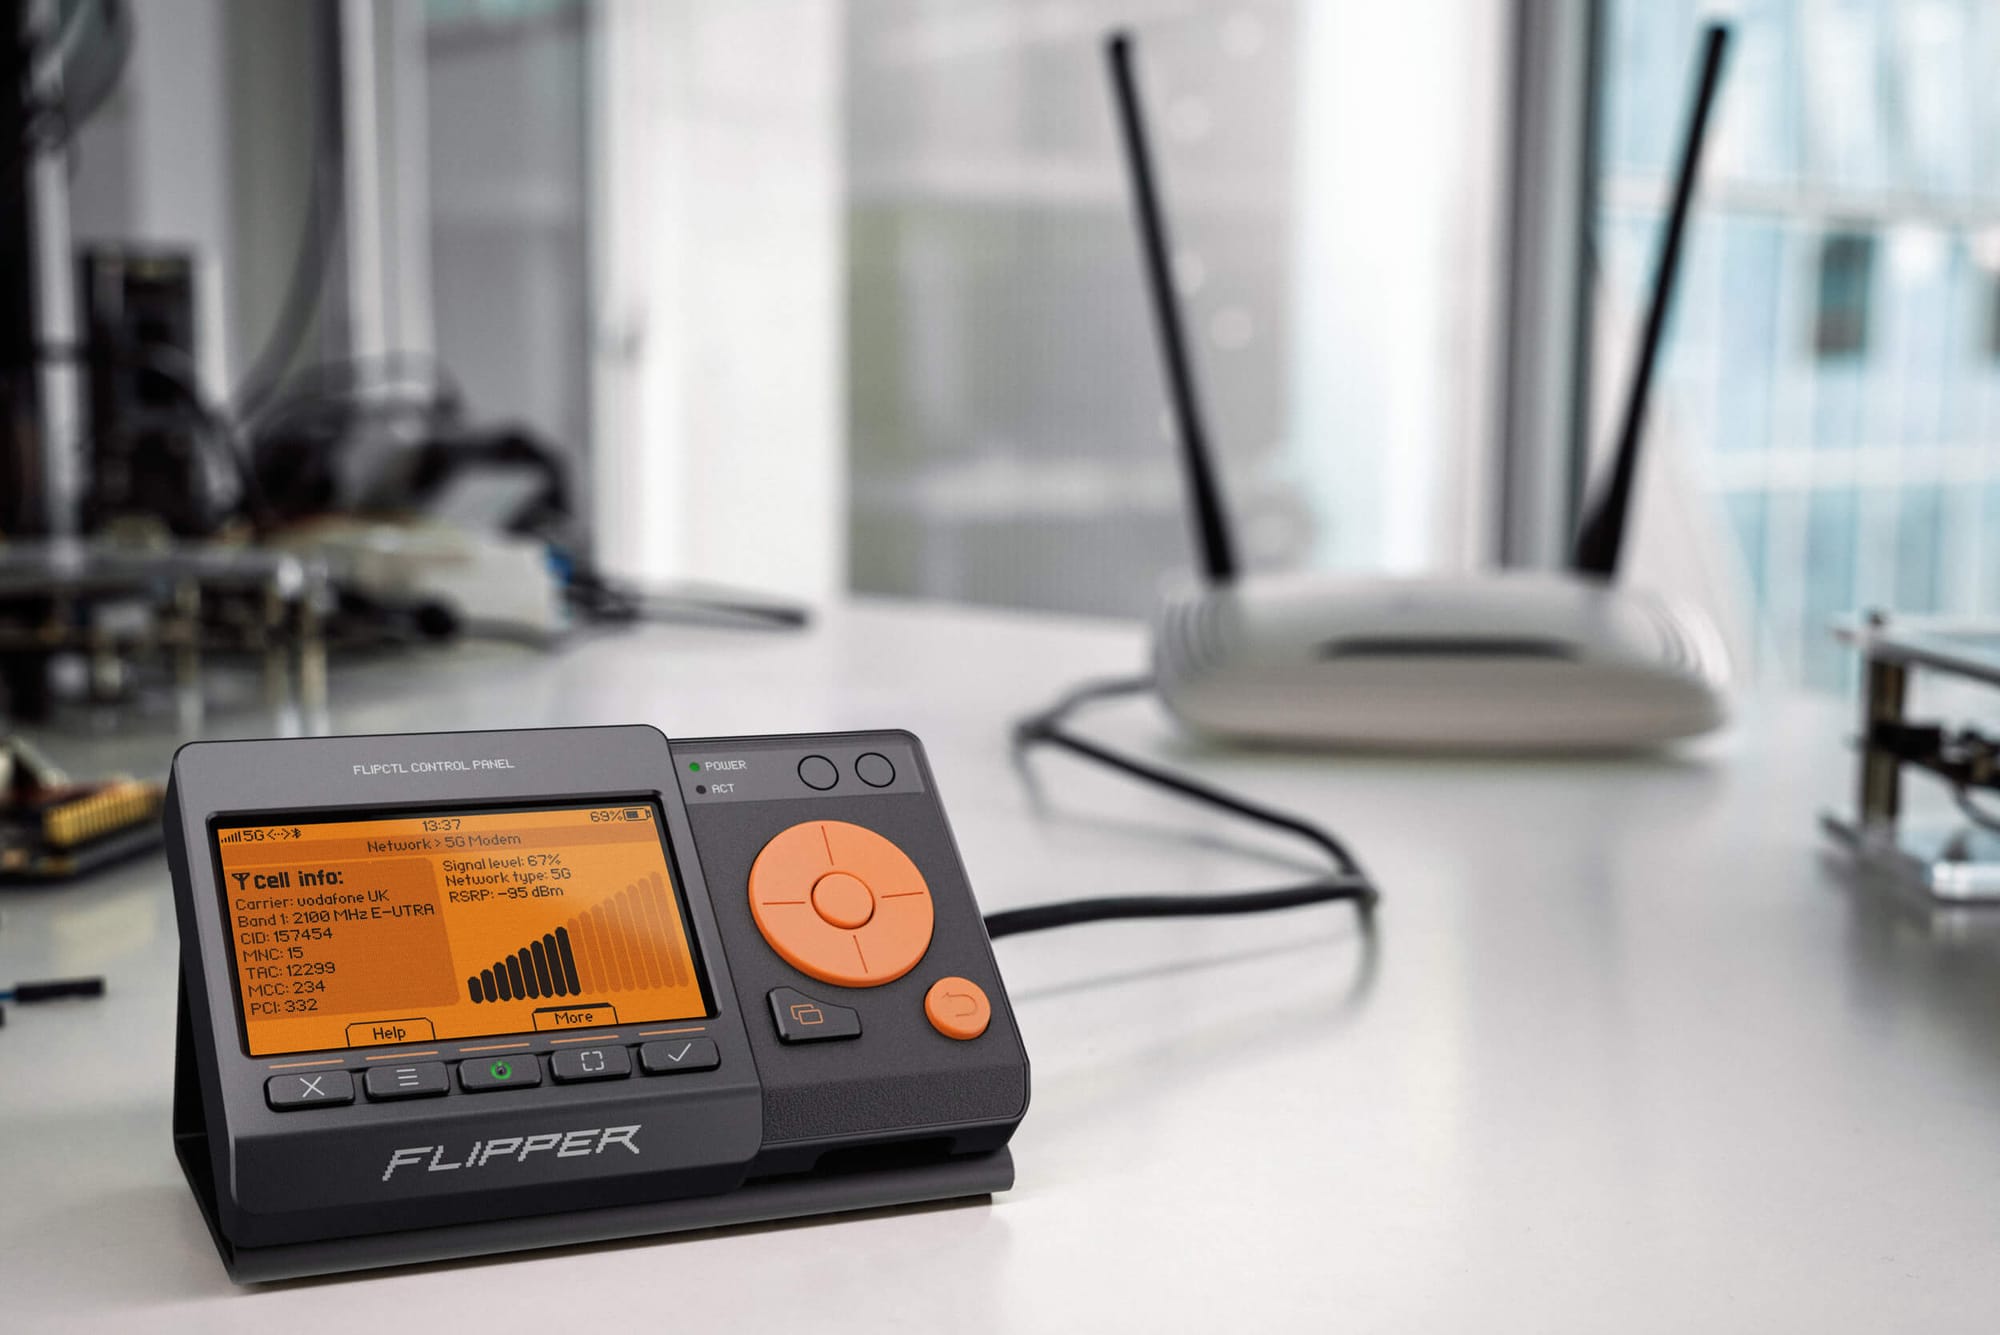
To bring the same physical control experience as on Flipper One to other platforms, we decided to create a separate device: the FlipCTL Control Panel. It has the same screen and buttons as Flipper One, and it can be connected to any Linux computer, such as a Raspberry Pi, server, or router, and give you the same interface with a single command: apt install flipctl
We are currently looking for the optimal combination of mechanical design, controls, and host connection interfaces to make the panel as versatile as possible. At this point, we're planning two connection interfaces for the FlipCTL Control Panel:
- GPIO header compatible with Raspberry Pi, allowing the panel to be connected directly to single-board computers without additional cables or adapters.
- USB 2.0 for connecting to all other platforms: servers, computers, routers, etc.
0:00
/1:00
[Video] FlipCTL Control Panel prototypes and demo of connecting to Raspberry Pi GPIO header
You can connect the FlipCTL Control Panel to a computer, server, or router via a standard USB 2.0 connection. This allows you to add a graphical interface to any host.
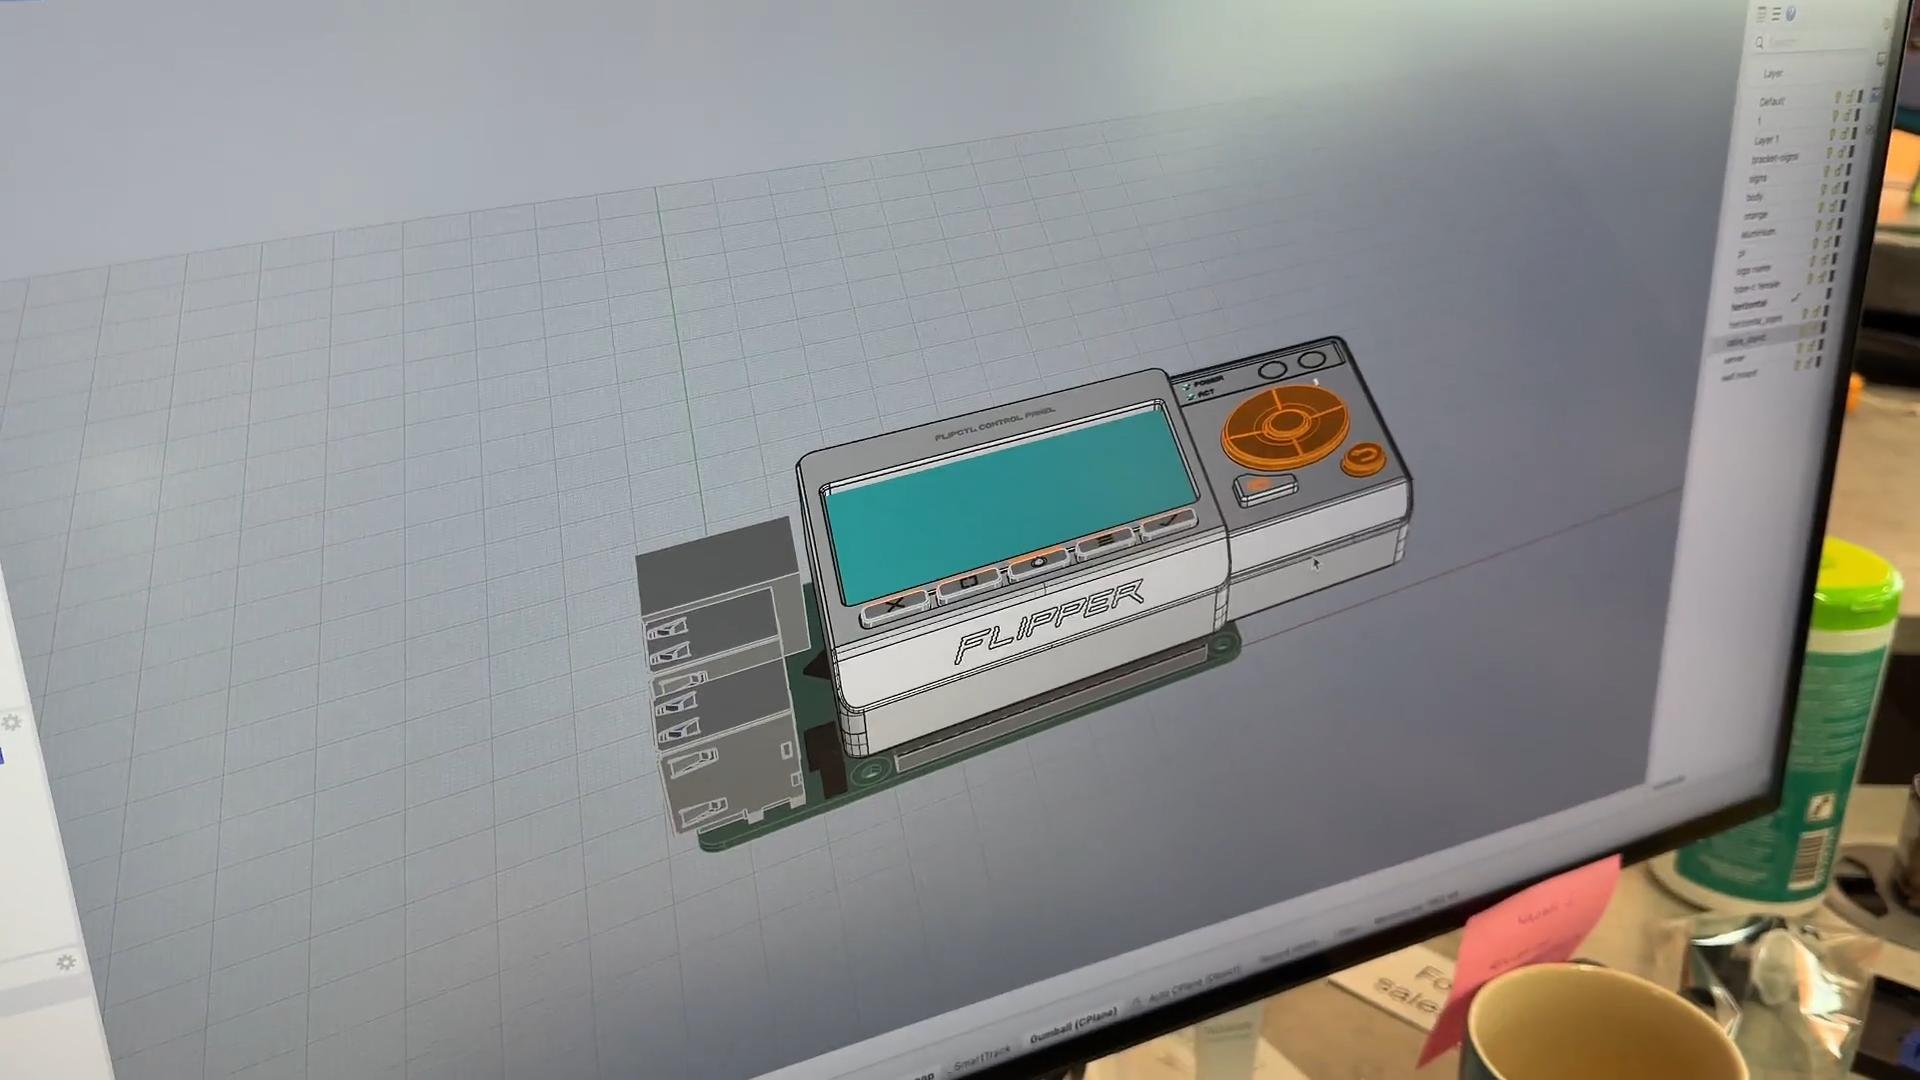
We plan to open-source the mechanical design of this panel, so anyone can design and 3D-print mounting brackets and desktop stands for it.
The FlipCTL Control Panel can be placed on a desk when connected to a desktop computer or Wi-Fi router. The panel is placed in a tilted stand.
It's true that there are already many solutions for creating a human-machine interface (HMI) out there. But most of them are complex, enterprise-focused tools that take a lot of work to get running on a real device. Can you name an HMI system that can be installed on a bare Raspberry Pi in under a minute?
We want the deployment of the FlipCTL base functionality to look like this:
- Connect the FlipCTL Control Panel to an SBC via the GPIO header or to any other host via USB.
- Install FlipCTL using the command
apt install flipctland run it. FlipCTL will automatically detect the panel and start the service. If the default settings work for you, you can leave them as is. - All done! You can now control the system using the small screen with buttons: view the IP address, disk usage, running services, system boot progress, etc. You can then customize FlipCTL for your specific use case, restrict which actions can be performed from the panel, or even lock the controls entirely to use it as a view-only dashboard.
All of this should take no more than one minute: from connecting the FlipCTL Control Panel to having a fully functional system. What other existing system can do the same?
- We are looking for an architect for the entire FlipCTL project. As a test assignment, please submit your proposed FlipCTL architecture via a pull request to this GitHub repository: github.com/flipperdevices/flipctl
- Please send any suggestions regarding the FlipCTL Control Panel hardware interfaces here: github.com/flipperdevices/flipperone-hardware/issues/133